Getting started with Draft.js
Draft.js is an open source library for handling rich text editing with React.
Draft.js handles the storing of the editor state (e.g. text, transformations and undo/redo stack) by storing everything into an EditorState object. It is a complete snapshot of the editor state.
EditorState object itself maintains the undo/redo stack of the editor. This stack is comprised of ContentState objects.
ContentState object represents the contents of the editor (e.g. text, entity ranges and inline styles) and selection states before and after rendering the contents.
Entity ranges is something we won't be touching on this post but if you wish you can read more about them from the documentation.
I believe that best way to learn is just start doing so let's dive in and create a basic editor component.
I just published a class where I teach more about Draft.js. Best part is that you can get it for free! Read more.
Basic Draft.js editor usage
We are going to make a React component with a Draft.js editor that has basic bold, underline and italic rich text editing functions. I am going to use codesandbox.io for this example. You can find the finished sandbox for this tutorial here. Go ahead and fork it so you can make changes, follow along and play around with it.
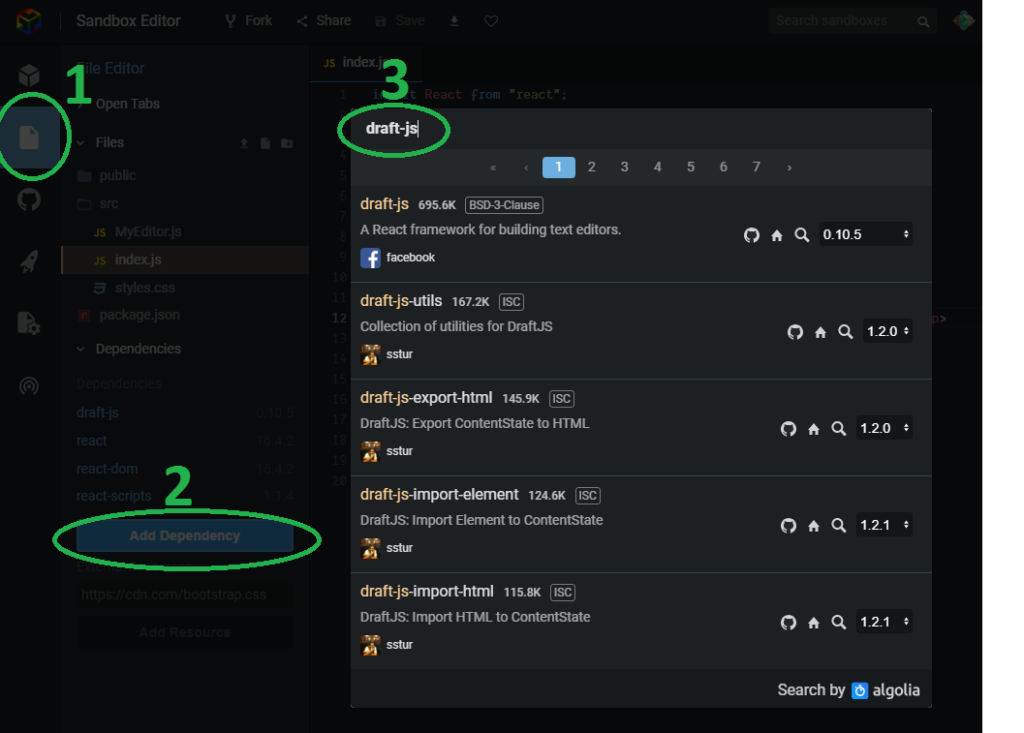
First off we need to add Draft.js to our project. In codesandbox you can do this by opening the "File editor" tab from the left and under "Dependencies" click "Add dependency" and search for draft-js.
Now let's add a new file MyEditor.js which will hold our editor component.
In the MyEditor.js file let's type in the following:
1import React, { Component } from "react";
2import { Editor, EditorState } from "draft-js";
3
4const wrapperStyle = {
5  border: "1px solid gray", // add some border
6  width: "400px", // set fixed width
7  margin: "auto", // aligns the component in the middle
8  textAlign: "left", // start the text from left hand side
9};
10
11class MyEditor extends Component {
12  constructor(props) {
13    super(props);
14    this.state = { editorState: EditorState.createEmpty() };
15    this.onChange = (editorState) => this.setState({ editorState });
16  }
17
18  render() {
19    return (
20      <div>
21        <div style={wrapperStyle}>
22          <Editor
23            editorState={this.state.editorState}
24            onChange={this.onChange}
25          />
26        </div>
27      </div>
28    );
29  }
30}
31
32export default MyEditor;
This will render an instance of Draft.js editor and add some styling for the wrapping div. As you can see we are importing Editor and EditorState from the draft-js library. Editor is the actual component for the editor and EditorState is a top-level state object for the editor.
In the constructor we want to define a state for the component. We will store the state of the editor in an editorState variable. We initialize it with EditorState.createEmpty() because it must be a valid EditorState object and EditorState.createEmpty() returns a new EditorState object with an empty ContentState and default configuration.
Because the editor will be a controlled component, we need to define onChange function for it. We define it in the constructor and in it, we will update the component's state with new editorState object.
In the component's render method we render the Editor component with editorState and onChange props. The editor should now look like this.

We now have a working editor component but we don't yet have any rich text editing functionality in it. So let's add the bold, italic and underline commands to our editor.
Here is the updated code for the MyEditor.js component that includes the functionality for bold, italic and underline features. The changes are highlighted.
1import React, { Component } from "react";
2import { Editor, EditorState, RichUtils } from "draft-js";
3
4const wrapperStyle = {
5  border: "1px solid gray", // add some border
6  width: "400px", // set fixed width
7  margin: "auto", // aligns the component in the middle
8  textAlign: "left", // start the text from left hand side
9};
10
11class MyEditor extends Component {
12  constructor(props) {
13    super(props);
14    this.state = { editorState: EditorState.createEmpty() };
15    this.onChange = (editorState) => this.setState({ editorState });
16    this.handleKeyCommand = this.handleKeyCommand.bind(this);
17  }
18
19  handleKeyCommand(command) {
20    const { editorState } = this.state;
21    const newState = RichUtils.handleKeyCommand(editorState, command);
22    if (newState) {
23      this.onChange(newState);
24      return true;
25    }
26    return false;
27  }
28
29  render() {
30    return (
31      <div>
32        <button onClick={() => this.handleKeyCommand("bold")}>Bold</button>
33        <button onClick={() => this.handleKeyCommand("italic")}>Italic</button>
34        <button onClick={() => this.handleKeyCommand("underline")}>
35          Underline
36        </button>
37
38        <div style={wrapperStyle}>
39          <Editor
40            editorState={this.state.editorState}
41            onChange={this.onChange}
42            handleKeyCommand={this.handleKeyCommand}
43          />
44        </div>
45      </div>
46    );
47  }
48}
49
50export default MyEditor;
So first we import RichUtils module from the draft-js library. It contains a set of utility functions for rich text editing.
We pass handleKeyCommand prop for the Editor. This will allow us to handle the key commands.
In the handleKeyCommand method, we use RichUtils.handleKeyCommand function to apply the given command for the current editorState. The command is a string e.g. "bold", "italic" or "underline". The RichUtils.handleKeyCommand function will take care of applying the given style to the editorState. Note that in order for "this" to work inside handleKeyCommand method, we need to add the following line to the constructor:
this.handleKeyCommand = this.handleKeyCommand.bind(this);
We also need to return true / false from the handleKeyCommand method so that the editor knows if the command was handled or not.
Finally we add three buttons in the render method that when clicked, call the handleKeyCommand method with appropriate command. Note that the commands must be lowercase.

That's it! Now we can highlight text and use either the buttons or the keyboard shortcuts (ctrl/cmd+B, ctrl/cmd+I, ctrl/cmd+U) to apply styles to the text in the editor.
Conclusion
We went over how to create a component that handles rich text editing using Draft.js. As we saw, adding rich text editing to React component is not that complicated. Hopefully this tutorial helped you in getting started with Draft.js. If you have any questions or comments be sure to drop them into the comment section! All comments are appreciated!
Want to know more?
I have also written about How to display Draft.js content as HTML and How to store Draft.js content. So be sure to check those out too!